Sunday, December 29, 2019

Making a Guitar Shaped Side Table with an X-Carve CNC Machine

I needed a side table to put next to my favorite chair in my office/music room.  I have several guitars on display, so I thought it would be cool to make a guitar shaped side table to keep the music theme going.  I used my X-Carve CNC Woodworking Machine from Inventables to cut the table top and legs.  Check out the video of this project below.


I'd like to thank Inventables for sponsoring this project.  I used their free EASEL online software to design the project.  The top is cut from a 16"x24" panel of 3/4" walnut.  The legs are cut from a 9"x21" section of 9/16" thick maple.  (I had to plane the maple down to 9/16" thick so that the standard tuning pegs would fit.  I also made the mortises 9/16" wide to match.)   Click here to open my EASEL project to see how it's designed.


The design includes the mortise and tenon joinery for gluing the legs into the table top.  The CNC leaves rounded inside corners on the tenons, so those need to be sharpened up with a chisel, file or saw so the joint will fit tightly.


I purchased an inexpensive set of Guitar Tuners from CB Gitty.  You will notice that one of the holes in the scaled-down guitar neck legs is larger than the others.  This is to mount one of the standard size guitar tuners on each leg.  I strung up a regular .042" A string between the tuners for some additional support to keep the legs from spreading apart under weight.  The .056" E string would be a little stronger and more visible, but I didn't have one on hand.


This Guitar Side Table is a great addition to my office/music room.  I love it and it's a great conversation piece.  The walnut and maple look beautiful and I think the "stringer" at the bottom is pretty clever if I do say so myself.  Thanks for checking out my project!


Clicking a referral/affiliate link in this article and making a purchase will help to support my channel via a small referral fee from the merchant.  Thank you for your support!

Monday, September 23, 2019

Making a Funko Pop Rocks Stage Set

Funko Pops are pop culture action figures made from vinyl.  I collect the Funko Pop Rocks series that features members of awesome rock bands, like KISS and Metallica.  I thought it would be cool to make a concert stage set to display them on, so check out my video below, then read on for more information about this fun project.


I'd like to thank Inventables for sponsoring this project and providing me with the X-Carve CNC Machine that made this a snap to build.  I used their free EASEL online software to design the project, then the machine cut it from a single 1x12 pine board (.75"x11.25"x27").  Click here to open my EASEL project to see how it's designed.


The stage set features a large main stage with a groove in the back to hold a record album cover as a backdrop.


It also has three elevated platforms, four guitar amps, and an overhead lighting truss with an LED Light Strip.  The only other additions were three pieces of 1/2" dowel rod to raise the platforms and a little paint.  (I did not paint the surfaces that would touch the vinyl figures, as some finishes may deteriorate vinyl.)


Some of the drummer figures come with a small drum set, but some do not.  My EASEL design includes a bass drum and a pair of toms that can be glued together and painted for those ill-equipped drummers.


I have Metallica, KISS, Guns n Roses, and Rush.  Angus Young and Animal are sitting in for the missing original GNR members.  I also have The Police and Wayne's World figures in my collection (not pictured).  Thanks for checking out my project!


Wednesday, June 19, 2019

Make a Custom Guitar Pedal Board out of Wood!

I made this custom guitar effects pedal board out of pine boards from the home center.  All you need is a saw, glue, hammer, nails, wood, paint, and Velcro.  Watch my video of this project below, then read further for more details and pictures.


Do you wanna make my pedal board too?  Click here to download the FREE templates!  Basic measurements are provided as well as cutting templates for the side and center supports.


I glued additional boards onto the back two rails so that those pedals would be elevated.  I can easily step on the back row's switches without hitting the knobs on the front row of pedals.


Make sure you lay out your pedals with cables so you can get good measurements for the overall size board you need.  Consider making it a little bigger because we all know you will be adding more pedals right?  If you plan to take it on the road, buy a case first, then make the pedal board to fit the case.  My board ended up being about 12" x 30".


Don't forget to add some non-skid pads to the bottom to keep it from sliding around, and to keep it from scratching floors.  I used 1" Industrial Strength Velcro to secure the pedals to the board.  I put the soft fuzzy side on the board and the scratchy side on the back of the pedals.  Note that you may need to remove some rubber pads from the bottom of your pedals.


This was a fun project and it is nice to have all of my pedals organized and available for stomping at the tips of my toes.  One thing is for sure, pedals are so much fun to collect that your pedal board will never be finished!


Tuesday, June 11, 2019

Making Polygon Pencil Holders

These Polygon Pencil Holders make great gifts and craft show projects, and they are easy to make with a table saw.  In this video, I show how to make triangle, rectangle, pentagon, and hexagon pencil holders.  Check out my video showing the process below.


The Wixey Digital Angle Gauge makes it really easy to set the table saw blade to accurate angles.  I wouldn't want to try making these without it.  I put it on the table saw surface to zero it, and then put it on the blade to set it to the desired angle.  It's also backlit so it is easy to read.


There are two ways to add the bottom.  For option 1 on the left side of the picture below, I used the table saw to cut dadoes about 1/4" up from the bottom, then cut a bottom piece that fits inside the box.  For option 2 on the right, I cut a base that you can glue the top onto.  Both ways are easy to do, so it just depends on the look you are going for.


These Polygon Pencil Holders were fun to make and and they are perfect projects for small scraps that seem to pile up in the shop.  They are easy to batch out for craft shows too.  Try making a 7-sided pencil holder...I don't even know what that polygon would be called!


Monday, June 3, 2019

Making a Wooden Union Jack Flag

In a previous video, I made a Wooden American Flag for my office. My wife is from England, so I wanted to make a Wooden Union Jack Flag for her. Watch my video below to see the basic steps, then click here to download my plans and make one yourself!


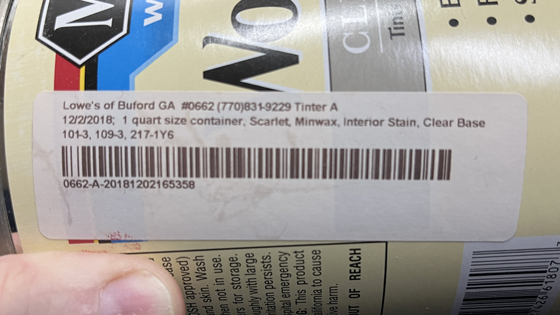
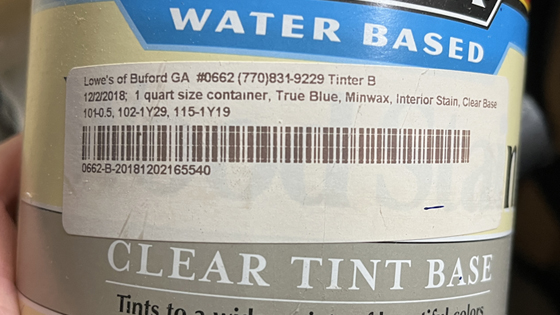
This was a fun project and it looks awesome!  I love the look of the Minwax Tintable Water-Based Stain.  You can only get the Scarlet Red and True Blue colors from the Lowes Paint Center.  (Below are the formulas for these custom stain colors, in case Lowes changes their standard colors.)

Wooden Union Jack Flag by The Carmichael Workshop

Lowes Scarlet Red Custom Stain Color

Lowes True Blue Custom Stain Color


Monday, May 27, 2019

Make a DIY Rustic Wooden American Flag

I made a Rustic Wooden American Flag to hang in my office.  This is a fun project that is easy to make using supplies from the home center.  Watch my video, then read further for a list of supplies, instructions, and photos.


Below is a list of supplies that I used on this project:
  • One 15" length of a pine 1x12 board.
  • Five 8-foot 1x2 pine boards.
  • Wood Glue
  • Picture hanging wire, 2 washers, 2 screws for the hanger.
  • Minwax Tintable Water-Based Stain (Below are the Lowes formulas for custom tinting the stain Scarlet Red and True Blue, in case they remove them from their standard color list.)
Lowes True Blue Stain Formula

Lowes Scarlet Red Stain Formula

Lowes Stain Formulas

Inventables Easel Stars Project
Designing the Stars in the Inventables EASEL PRO Software
Here are the basic instructions for this project:
  1. Cut six 37" stripes.
  2. Cut seven 22" stripes.
  3. Cut four 19" braces for the back.
  4. Cut one 10.5"x15" panel.  (Note: The 1x2's from the home center can vary in width.  Measure the height of the seven short stripes and cut the panel to match.)
  5. Round over the front edges with a 1/8" roundover bit in a router.
  6. Use a blow torch to scorch the wood (if desired).
  7. Stain three 37" stripes and four 22" stripes Scarlet Red.
  8. Stain the panel True Blue.
  9. Add the stars to the panel.  I used my Inventables X-Carve CNC Machine and the EASEL PRO software to engrave the stars with a 90 degree V-Bit.  Click here to open my Stars project.
  10. Glue the flag together using minimal wood glue to avoid lots of squeeze out.
  11. Clamp the flag to pull it all together.
  12. Attach the four braces to the back with glue and nails.  Make sure one brace overlaps the joint between the union and the shorter stripes.  Space them evenly.
  13. Spray with a clear coat finish.  I used Deft Clear Wood Finish Satin Lacquer.
Rustic Wooden Flag Assembly
Assembling the Flag
If you don't have a CNC machine, check out these other options for adding stars to the panel:
Hanging the Flag
Hang the Flag using Picture Wire, Washers and Screws
This was a fun project and it looks awesome!  You can get really creative with the blow torch effect.  These flags are very popular and sell well if you would like to try to make some money from your woodworking.  God bless the U.S.A!

Rustic Wooden American Flag by The Carmichael Workshop
DIY Rustic Wooden American Flag by The Carmichael Workshop


Clicking a referral/affiliate link in this article and making a purchase will help to support my channel via a small referral fee from the merchant.  Thank you for your support!


Saturday, May 18, 2019

Making a Rubik's Cube Birdhouse

I built this birdhouse to look like a classic 1980's Rubik's Cube.  Watch my video of the process and read further for more information and pictures.


To make the birdhouse, I tilted my table saw blade to 45 degrees, then cut six 9" squares with bevels on all sides.  I drilled a 1.5" hole in the front and glued together the sides and top.

Carmichael Workshop Rubik's Cube Birdhouse

I glued a cross piece in the bottom opening so that I would have something to screw the bottom to.  I also drilled some ventilation/drainage holes inside the grooves on the yellow bottom piece.

Carmichael Workshop Rubik's Cube Birdhouse

Just for fun to finish it off, I printed the classic Rubik's Cube logo on a label and stuck it on.

Carmichael Workshop Rubik's Cube Birdhouse

I made a display stand for it.  It's just a square piece of plywood with three boards glued on in the shape of a triangle.  It will probably remain on display in my shop with all of my other crazy birdhouses.  Click here to check those out too!

Carmichael Workshop Rubik's Cube Birdhouse

Sunday, March 24, 2019

Making an Autographed Van Halen CD Frame with the Inventables X-Carve

Back in 1988, I won an autographed Van Halen CD from the Rockline radio show.  It's hard to believe that was over 30 years ago!  I think it's past time to build a display frame for it.  I put my Inventables X-Carve CNC Machine to work to make a cool Van Halen striped frame out of cherry and maple.  Watch the video below, then read further for more details and pictures.


This is a CD single for the song Black and Blue from Van Halen's OU812 album.  It is signed by Eddie, Alex, Michael, and Sammy.  Van Halen is my favorite rock band, so this is a cool thing to have.


I kept the letter that Rockline sent with the CD to prove the authenticity of the autographs.  It has a sketch of an old phone plugged into a boombox to represent calling into a radio show, which looks dated but kinda cool.


I had to be really careful when preparing the blank for this project.  The X-Carve is very accurate, so my frame had to be perfectly square so that the CNC could carve the stripes in the correct place and centered around the frame border.


The frame looks great in the EVH corner of my office.  I should have framed this CD 30 years ago!  Oh well, better late than never.  I hope this project gives you some ideas for framing autographs or other memorabilia.  If you would like to check out this project in the Inventables Easel software, click here to open my project.  You can even carve one yourself if you have an X-Carve.


Clicking a referral/affiliate link in this article and making a purchase will help to support my channel via a small referral fee from the merchant.  Thank you for your support!

Monday, March 11, 2019

Wooden Tesla Album Cover for Makers Rock 2019

I reproduced Tesla's "Mechanical Resonance" album cover out of wood for the 2019 Makers Rock Album Art Collaboration on YouTube!  Check out my video and enter my giveaway for a chance to win this artwork.  Don't forget to watch the other participants' videos in this Makers Rock Playlist and enter their giveaways too!


Here is a picture of the wooden Tesla album artwork I created.  This was a fun project to make and I can't wait to do another album next year.  If you are interested in the next Makers Rock event, keep an eye on the Makers Rock Website for updates.

Makers Rock Tesla Album Cover Art by The Carmichael Workshop

Enter for a chance to win this album artwork in the Rafflecopter widget below (for USA residents ages 18 and older only).  The deadline to enter is March 29, 2019 at 11:59pm Pacific time.  A winner will be selected on March 30th and automatically displayed in the Rafflecopter widget below.  Good luck!

a Rafflecopter giveaway
This giveaway is not associated with Google, Blogger, YouTube, Facebook, Instagram, or Twitter in any way.
#makersrock

Friday, February 15, 2019

How to Make a Rustic Toy Box

I made this Rustic Toy Box for a relative based on a picture they sent me.  It's made from 1x4 furring strips and can be built using limited tools.  Watch my video, then read further for details and download my plan to make one yourself.


This project requires a minimum of eight 8-foot 1x4 furring strips that are readily available at the home center.  Take your time and be selective when you pick out the boards.  Make sure they are straight and check for any defects.  I suggest buying one or two extra boards since they are so inexpensive, in case you discover defects later or you make a mistake.


Click here to download my plan for this project.  Cut all of the pieces to size then assemble it using a nail gun and glue.  You can also use a hammer and nails or screws.  Note that the furring strips can vary in width a little, so always measure your actual pieces in case you need to adjust the plan.  I used 1/2 rope for handles and a pair of strap hinges.  I used hardboard for the bottom.


Lid supports come in both a left version and a right version, so I installed one on each side of the toy box.


I finished the toy box with Minwax Wood Conditioner, then Minwax Provincial Stain, and sprayed it with two coats of Satin Polyurethane.  The toy box turned out great and will only look better after lots of use and abuse.