Wednesday, June 19, 2019

Make a Custom Guitar Pedal Board out of Wood!

I made this custom guitar effects pedal board out of pine boards from the home center.  All you need is a saw, glue, hammer, nails, wood, paint, and Velcro.  Watch my video of this project below, then read further for more details and pictures.


Do you wanna make my pedal board too?  Click here to download the FREE templates!  Basic measurements are provided as well as cutting templates for the side and center supports.


I glued additional boards onto the back two rails so that those pedals would be elevated.  I can easily step on the back row's switches without hitting the knobs on the front row of pedals.


Make sure you lay out your pedals with cables so you can get good measurements for the overall size board you need.  Consider making it a little bigger because we all know you will be adding more pedals right?  If you plan to take it on the road, buy a case first, then make the pedal board to fit the case.  My board ended up being about 12" x 30".


Don't forget to add some non-skid pads to the bottom to keep it from sliding around, and to keep it from scratching floors.  I used 1" Industrial Strength Velcro to secure the pedals to the board.  I put the soft fuzzy side on the board and the scratchy side on the back of the pedals.  Note that you may need to remove some rubber pads from the bottom of your pedals.


This was a fun project and it is nice to have all of my pedals organized and available for stomping at the tips of my toes.  One thing is for sure, pedals are so much fun to collect that your pedal board will never be finished!


Tuesday, June 11, 2019

Making Polygon Pencil Holders

These Polygon Pencil Holders make great gifts and craft show projects, and they are easy to make with a table saw.  In this video, I show how to make triangle, rectangle, pentagon, and hexagon pencil holders.  Check out my video showing the process below.


The Wixey Digital Angle Gauge makes it really easy to set the table saw blade to accurate angles.  I wouldn't want to try making these without it.  I put it on the table saw surface to zero it, and then put it on the blade to set it to the desired angle.  It's also backlit so it is easy to read.


There are two ways to add the bottom.  For option 1 on the left side of the picture below, I used the table saw to cut dadoes about 1/4" up from the bottom, then cut a bottom piece that fits inside the box.  For option 2 on the right, I cut a base that you can glue the top onto.  Both ways are easy to do, so it just depends on the look you are going for.


These Polygon Pencil Holders were fun to make and and they are perfect projects for small scraps that seem to pile up in the shop.  They are easy to batch out for craft shows too.  Try making a 7-sided pencil holder...I don't even know what that polygon would be called!


Monday, June 3, 2019

Making a Wooden Union Jack Flag

In a previous video, I made a Wooden American Flag for my office. My wife is from England, so I wanted to make a Wooden Union Jack Flag for her. Watch my video below to see the basic steps, then click here to download my plans and make one yourself!


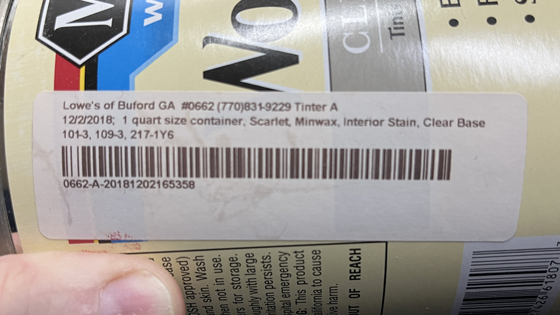
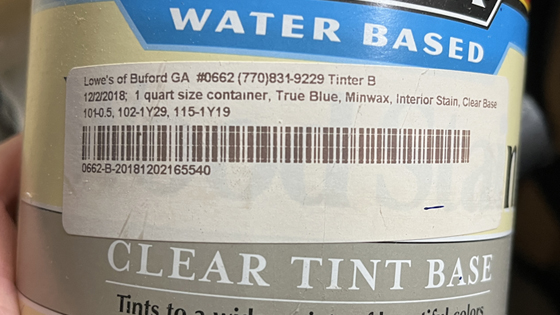
This was a fun project and it looks awesome!  I love the look of the Minwax Tintable Water-Based Stain.  You can only get the Scarlet Red and True Blue colors from the Lowes Paint Center.  (Below are the formulas for these custom stain colors, in case Lowes changes their standard colors.)

Wooden Union Jack Flag by The Carmichael Workshop

Lowes Scarlet Red Custom Stain Color

Lowes True Blue Custom Stain Color